내일배움단 Web4.3
[웹개발 종합반] 4주 3일차 개발일지(4주 10-16강, 숙제)
💻TIL Web.403
‘나홀로 메모장’ 프로젝트
1. 프로젝트 세팅
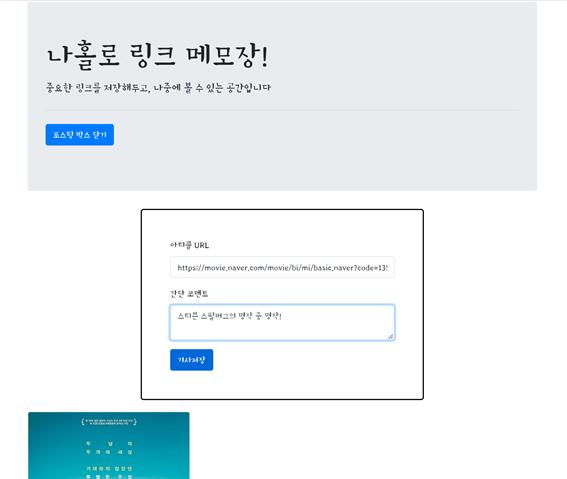
이번 프로젝트에서는, 이전에 만든 ‘나홀로 링크 메모장’ 페이지를 서버와 연동해 입력한 URL과 리뷰가 카드 형태로 붙여질 수 있도록 할 것이다. URL만 입력하지만, 카드에서는 페이지의 이미지와 설명까지 딸려오며, 이것은 웹 스크래핑(크롤링)으로 가능한 것이다.
먼저, flask 폴더 구조에 따라 새로운 프로젝트 폴더를 만들고(venv 체크!), ‘templates’, ‘static’ 폴더, 그리고 ‘app.py’ 파일과 ‘templates’ 폴더 안 ‘index.html’ 파일을 생성한다. 설정 > 프로젝트 > Python 인터프리터에 들어가 ‘flask’, ‘pymongo’, 웹 크롤링에 필요한 ‘requests’, ‘bs4’를 설치한다.
2. API 설계하기
프로젝트를 시작하기 전, 만들고자 하는 서비스에 어떤 기능이 필요하고 그 기능을 어떠한 순서로 구현할 것인지 계획하는 설계 과정이 필요하다.
‘나홀로 링크 메모장’에 필요한 기능은 두 가지다. 첫 번째로, 클라이언트가 URL과 코멘트를 서버로 보내주고 서버는 그 데이터를 DB에 저장한다. 두 번째로, 서버에서 클라이언트로 데이터를 내려주고, 클라이언트는 화면에 카드들을 보여준다. DB에서는 이미지, 제목, 설명, 코멘트 데이터를 저장해야 한다. 카드에서 영화 제목을 클릭하면 해당 링크로 이동하기 때문에, 링크도 저장해 두어야 한다.
먼저, 카드를 생성하는 API를 설계해보자. 설계는 요청 정보(URL, 요청 방식, 요청 데이터 종류와 변수명) / 서버가 제공할 기능 / 응답 데이터로 구성된다.
1) 포스팅 API 설계(POST)
① 요청 정보
DB에 새로운 데이터를 생성(create)하는 것이기 때문에 POST 요청을 이용한다. URL은 ‘/memo’로, url_give로 URL 데이터를, comment_give로 코멘트 데이터를 받는다.
② 서버가 제공할 기능
서버는 클라이언트 쪽에서 받아온 URL의 메타 태그 정보를 바탕으로 제목, 설명, 이미지 주소(URL)를 스크래핑한다. 그 다음 스크래핑한 데이터를 모두 DB에 저장한다.
③ 응답 데이터
서버가 데이터를 DB에 잘 저장했다면, 클라이언트에게 API가 정상적으로 작동함을 알리는 success 메세지를 준다. 메세지는 JSON 형식으로 'result' = 'success'를 입력한다.
2) 리스팅 API 설계(GET)
① 요청 정보
저장된 카드를 보여주는(read) 것이기 때문에 GET 요청을 사용한다. 포스팅 API와 같은 ‘/memo’ URL을 사용하고, 클라이언트 쪽에서 받는 데이터 없이, DB에 저장된 데이터를 조회하는 것이기 때문에 요청할 데이터는 없다.
② 서버가 제공할 기능
서버는 DB에 저장되어 있는 모든 제목, 설명, 링크, 이미지 주소, 코멘트 정보를 가져온다.
③ 응답 데이터
각 기사들의 정보(제목, 설명, 링크, 이미지 주소, 코멘트)로 카드를 만들어서 붙여야 한다. JSON 형식으로 'articles': 기사 정보를 입력한다. 이 리스팅 API는 클라이언트에서 로딩되자마자 호출된다는 것도 기억하자.
‘기사 저장’ 버튼에 Ajax 콜, 로딩되자마자 호출하는 것에 Ajax 콜을 만든다. 복습 차원에서, Ajax는 자바스크립트를 이용해 페이지 전환 없이 서버에서 값을 받아오는 방법이다. 2주차 Ajax 관련 개발일지를 참고하자.
3. 조각 기능 구현하기
API를 설계한 다음, 구현하고자 하는 기능을 조각내어 시험해보는 단계를 거친다. 예를 들어, URL 주소의 이미지와 제목, 설명을 자동으로 가져오는 API를 구상했다면, 설계가 잘 되었는지 검증하는 과정이 필요하다. 프로젝트를 시작하기 전 별개의 파일을 만들어 API에서 수행할 기능들을 미리 테스트하는데, 이를 조각 기능이라고 한다. 프로젝트 실전에서 코드를 짜기보다는, 별개의 파일에서 실행해본 후 코드를 붙여넣는 방식이 편리하다.
1) meta 태그
입력한 URL 주소의 이미지, 제목, 설정을 크롤링하는 기능을 조각 기능으로 구현해 보자. 이는 meta 태그 스크래핑을 통해 구현한다. meta 태그는 아래 사진과 같이 HTML 문서의 <head> 태그 안에 위치하며,눈으로 보이는 <body> 태그 이외에 사이트의 속성을 설명해주는 태그들이다. HTML을 공부할 때, 사이트가 검색되었을 때 뜨는 제목과 설명 등을 입력하는 태그라고 배운 적이 있다. 이처럼 구글 검색 시 표시되는 설명문, 사이트 제목, 카톡 공유 시 표시되는 이미지 등이 모두 <meta> 태그에 포함된다.
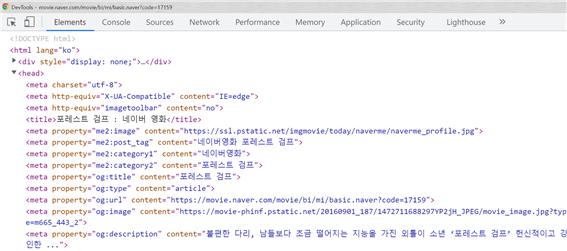
2) og:title, og:image, og:description
태그를 살펴보면, og:title, og:image, og:description의 property를 가진 <meta> 태그들이 각각 영화 제목, 이미지 주소와 설명 데이터를 가지고 있다. 각각의 데이터를 위 속성을 가진 메타 태그에 넣어놓으면, 어느 사이트에서든지 자동으로 해당 데이터를 크롤링해갈 수 있다. 카카오톡과 같은 여러 메신저들에서는 이 속성들을 가진 meta 태그를 불러와서 이미지와 제목, 설명을 보여준다. 내가 URL을 만드는 입장이라면, og:title, og:image, og:description에 데이터를 잘 넣어두어야 해당 링크를 공유할 때 제목과 이미지, 설명이 잘 표시될 것이다.
3) meta 태그 크롤링하기(bs4)
프로젝트 폴더인 ‘alonememo’에 조각 기능 구현을 위한 test.py 파일을 생성한다. 이 파일에서 먼저 크롤링을 연습한 다음, 실제 app.py에 필요한 부분을 가져다 쓴다. 앞서 말했듯, 주요 기능은 일단 작동되도록 한 다음 실제 프로젝트에 써먹는 것이 편하다. 실제 크롤링에 앞서, 3주차에 배운 크롤링 관련 개발일지를 읽고 복습해보자.
# 크롤링 기본 코드
import requests
from bs4 import BeautifulSoup

url = 'https://movie.naver.com/movie/bi/mi/basic.nhn?code=171539'

headers = {'User-Agent' : 'Mozilla/5.0 (Windows NT 10.0; Win64; x64)AppleWebKit/537.36 (KHTML, like Gecko) Chrome/73.0.3683.86 Safari/537.36'}
data = requests.get(url,headers=headers)

soup = BeautifulSoup(data.text, 'html.parser')
시작 전, 위의 크롤링 기본 코드를 붙여넣는다. url에는 영화 ‘그린북’의 네이버 영화 페이지를 예시 주소로 입력했다. 변수 url은 requests.get을 통해 data 변수로 들어간다. 코드 작성에 앞서 print(soup)를 입력 후 실행, HTML 코드가 잘 찍히는지를 확인한다.
title = soup.select_one('#content > div.article > div.mv_info_area > div.mv_info > h3 > a')

print(title)
# <a href="./basic.naver?code=171539">그린 북</a>
print(title.text)
# 그린 북
영화 제목을 크롤링하기 위해, 사이트에서 영화 제목 우클릭 > 검사 > Copy > Copy Selector를 한다. select_one을 사용해 선택자(selector)를 붙여넣고 이를 출력하면 해당 태그가 찍힌다. 태그의 텍스트만을 얻고 싶다면 .text, 속성을 얻고 싶다면 ['속성']을 사용한다.
title = soup.select_one('head > meta:nth-child(9)')
print(title)
# None
하지만, 위 코드처럼 og:title 속성의 <meta> 태그 선택자를 복사해 출력해보면 ‘None’이 뜬다. 그 이유는 브라우저에서 페이지에 접속했을 때 나오는 <meta> 태그의 순서와, 파이썬 코드에서 접속했을 때의 <meta> 태그의 순서가 다르기 때문이다.
4) ‘meta[property=”og:title”]’
title = soup.select_one('meta[property="og:title"]')

print(title)
# <meta content="그린 북" property="og:title"/>
print(title['content'])
# 그린 북
여기에서 BeautifulSoup의 새로운 크롤링 방식을 도입할 수 있다. 아래 코드처럼 <meta> 태그를 크롤링할 때 선택자 복사(Copy Selector)가 아니라, select_one의 parameter에 'meta[]'를 입력하는 것이다. [] 안에는 <meta> 태그의 속성과 그 값을 입력한다. HTML 태그를 더블클릭 후 속성과 그 값을 그대로 복사해 붙여넣으면 된다. 이는 ‘<meta> 태그 중에서 속성이 [] 안에 입력된 값과 일치하는 것을 가져오라’라는 의미다. 출력된 값을 봤을 때 내가 필요한 데이터는 content의 속성값이므로 ['']를 이용한다.
더 간결한 코드를 위해, 아래 코드처럼 select_one 제일 마지막에 ['']를 붙이는 것이 좋다.
title = soup.select_one('meta[property="og:title"]')['content']
print(title)

# 그린 북
같은 방식으로 og:image와 og:description 태그를 크롤링한다. HTML 코드를 보면, 가지고 올 데이터들은 모두 해당 <meta> 태그의 content 속성에 있으므로 ['content']를 그대로 이용한다.
import requests
from bs4 import BeautifulSoup

url = 'https://movie.naver.com/movie/bi/mi/basic.nhn?code=171539'

headers = {'User-Agent' : 'Mozilla/5.0 (Windows NT 10.0; Win64; x64)AppleWebKit/537.36 (KHTML, like Gecko) Chrome/73.0.3683.86 Safari/537.36'}
data = requests.get(url,headers=headers)

soup = BeautifulSoup(data.text, 'html.parser')

title = soup.select_one('meta[property="og:title"]')['content']
image = soup.select_one('meta[property="og:image"]')['content']
desc = soup.select_one('meta[property="og:description"]')['content']
처음에 가져와야 할 데이터는 제목, 설명, 링크, 이미지 주소, 코멘트였다. 이 중 링크와 코멘트는 클라이언트로부터 받아오는 것이고, 그 외의 제목, 이미지, 설명은 위 코드를 통해 가져올 수 있으므로 조각 기능이 완성되었다고 볼 수 있다.
4. 뼈대 준비하기
index.html 파일과 app.py 파일을 세팅한다.
// HTML <script> 태그
$(document).ready(function () {
  showArticles();
});

function openClose() {
  if ($("#post-box").css("display") == "block") {
    $("#post-box").hide();
    $("#btn-post-box").text("포스팅 박스 열기");
  } else {
    $("#post-box").show();
    $("#btn-post-box").text("포스팅 박스 닫기");
  }
}

function postArticle() {
  $.ajax({
    type: "POST",
    url: "/memo",
    data: {sample_give:'샘플데이터'},
    success: function (response) { // 성공하면
      alert(response["msg"]);
    }
  })
}

function showArticles() {
  $.ajax({
    type: "GET",
    url: "/memo?sample_give=샘플데이터",
    data: {},
    success: function (response) {
      alert(response["msg"]);
    }
  })
}
# app.py
from flask import Flask, render_template, jsonify, request
app = Flask(__name__)

import requests
from bs4 import BeautifulSoup

from pymongo import MongoClient
client = MongoClient('localhost', 27017)
db = client.dbsparta

## HTML을 주는 부분
@app.route('/')
def home():
  return render_template('index.html')

@app.route('/memo', methods=['GET'])
def listing():
  sample_receive = request.args.get('sample_give')
  print(sample_receive)
  return jsonify({'msg':'GET 연결되었습니다!'})

## API 역할을 하는 부분
@app.route('/memo', methods=['POST'])
def saving():
  sample_receive = request.form['sample_give']
  print(sample_receive)
  return jsonify({'msg':'POST 연결되었습니다!'})

if __name__ == '__main__':
  app.run('0.0.0.0',port=5000,debug=True)
app.py 파일을 다음과 같이 세팅하고 난 후, 파일을 실행(Ctrl + Shift + F10)하고 ‘localhost:5000’에 접속하자마자 ‘GET 연결되었습니다!’라는 alert창이 뜨는 것을 확인할 수 있다.
5. 포스팅 API 만들기(POST)
API를 만드는 순서는 앞서 배운 것과 같이, 클라이언트와 서버의 연결 확인, 서버 만들기, 클라이언트 만들기, 완성 확인이다.
1) 클라이언트/서버 연결 확인하기
app.py 파일과 index.html 파일에서의 POST 요청 코드는 아래와 같다.
## API 역할을 하는 부분
@app.route('/memo', methods=['POST'])
def saving():
  sample_receive = request.form['sample_give']
  print(sample_receive)
  return jsonify({'msg':'POST 연결되었습니다!'})
<script>
  function postArticle() {
    $.ajax({
      type: "POST",
      url: "/memo",
      data: {sample_give:'샘플데이터'},
      success: function (response) { // 성공하면
        alert(response["msg"]);
      }
    })
  }
</script>

<body>
  ...
  <button type="button" class="btn btn-primary" onclick="postArticle()">기사저장</button>
  ...
</body>
파이썬 파일에서는 /memo URL 주소에서 sample_give라는 변수를 받는다. HTML 파일의 <script> 태그에서는 postArticle이라는 함수에 ajax 콜이 들어 있다. Ajax는 자바스크립트로 서버에서 데이터를 받아오는 방법으로, 클라이언트가 서버의 API 창구 문을 두드리는 행동이라 생각하자. Ajax 콜을 보면, 같은 URL 주소로 sample_give라는 변수로 ‘샘플데이터’라는 값을 주고 있다. response를 받는 데 성공하면 alert 창에 response의 msg 속성값을 띄운다. 이는 app.py 파일에서 내려주는(return) 값과 같다.
Ajax 콜을 담은 postArticle 함수는 포스팅박스의 버튼에 붙어 있다. ‘기사저장’ 버튼을 누르면 postArticle 함수가 불리고, 함수는 Ajax 콜을 하고, 콜이 성공적이면 받아온 메세지 값이 alert 창에 띄워질 것이다. ‘기사저장’ 버튼을 누르면 ‘POST 연결되었습니다!’ 창이 뜨므로 클라이언트와 서버의 연결이 확인되었다.
2) 서버 만들기
서버 쪽에서는 URL 주소와 코멘트를 받는다. request_form으로 URL과 코멘트를 각각 받고, 받은 URL 주소에서 제목, 이미지, 설명 데이터를 크롤링해온다. 크롤링 코드는 앞서 조각 기능에서 썼던 코드를 그대로 불러온다.
# test.py (조각 기능)
import requests
from bs4 import BeautifulSoup

url = 'https://movie.naver.com/movie/bi/mi/basic.nhn?code=171539'

headers = {'User-Agent' : 'Mozilla/5.0 (Windows NT 10.0; Win64; x64)AppleWebKit/537.36 (KHTML, like Gecko) Chrome/73.0.3683.86 Safari/537.36'}
data = requests.get(url,headers=headers)

soup = BeautifulSoup(data.text, 'html.parser')

title = soup.select_one('meta[property="og:title"]')['content']
image = soup.select_one('meta[property="og:image"]')['content']
description = soup.select_one('meta[property="og:description"]')['content']
코드 최상단 import 두 줄은 app.py 최상단에 가져와야 하는데, 이미 import되어 있으므로 생략한다. 그 이후부터의 코드를 모두 API 함수 안에 붙여넣는다. 파이썬의 문법 규칙을 따라, 한 줄 들여쓰기가 되어 있어야 함수의 내용물로 인식된다.
@app.route('/memo', methods=['POST'])
def saving():
  url_receive = request.form['url_give']
  comment_receive = request.form['comment_give']

  headers = {'User-Agent' : 'Mozilla/5.0 (Windows NT 10.0; Win64; x64)AppleWebKit/537.36 (KHTML, like Gecko) Chrome/73.0.3683.86 Safari/537.36'}
  data = requests.get(url_receive,headers=headers)

  soup = BeautifulSoup(data.text, 'html.parser')

  title = soup.select_one('meta[property="og:title"]')['content']
  image = soup.select_one('meta[property="og:image"]')['content']
  desc = soup.select_one('meta[property="og:description"]')['content']

  return jsonify({'msg':'저장이 완료되었습니다!'})
조각 기능에서의 예시 URL 주소와 달리, 실제 프로젝트에서는 클라이언트 쪽에서 받아온 URL 주소를 사용하므로 url 변수에 url_receive 값을 바로 줄 수 있다. 하지만 아래 data 변수의 url을 url_receive로 바로 치환하는 것이 더 간결하다. test.py 파일은 더 이상 필요하지 않으므로 삭제한다.
서버에서 모든 데이터를 받으면, insert를 이용해 DB에 데이터를 입력해야 한다. pymongo의 예시 코드를 다시 가져오자. pymongo 관련 개발일지 참고!
from pymongo import MongoClient
client = MongoClient('localhost', 27017)
db = client.dbsparta

# 저장 - 예시
doc = {'name':'bobby','age':21}
db.users.insert_one(doc)
pymongo도 마찬가지로 코드 상단의 import 부분은 app.py에 그대로 가져와야 한다. 이번에도 이미 import가 되어 있기 때문에 아래 코드만 가져온다. 위 예시처럼 필요한 데이터들을 담은 딕셔너리를 만들고, insert_one을 사용해 딕셔너리를 DB에 저장한다.
# app.py
@app.route('/memo', methods=['POST'])
def saving():
  url_receive = request.form['url_give']
  comment_receive = request.form['comment_give']

  headers = {'User-Agent' : 'Mozilla/5.0 (Windows NT 10.0; Win64; x64)AppleWebKit/537.36 (KHTML, like Gecko) Chrome/73.0.3683.86 Safari/537.36'}
  data = requests.get(url_receive,headers=headers)

  soup = BeautifulSoup(data.text, 'html.parser')

  title = soup.select_one('meta[property="og:title"]')['content']
  image = soup.select_one('meta[property="og:image"]')['content']
  desc = soup.select_one('meta[property="og:description"]')['content']

  doc = {
    'title': title,
    'image': image,
    'desc': desc,
    'url': url_receive,
    'comment': comment_receive
  }

  db.articles.insert_one(doc)

  return jsonify({'msg':'저장이 완료되었습니다!'})
이렇게, 새로운 카드 생성에 필요한 제목, 이미지, 설명, URL 주소, 코멘트 데이터가 모두 articles라는 콜렉션에 저장되었다.
3) 클라이언트 만들기
클라이언트에서는 URL 주소, 코멘트의 두 데이터를 받아 서버에 가져가야 한다. JQuery를 이용해 input 박스의 값을 가져온 다음, data에서 딕셔너리 형태로 서버에게 가져갈 데이터를 입력한다.
<script>
  function postArticle() {
    let url = $('#post-url').val()
    let comment = $('#post-comment').val()

    $.ajax({
      type: "POST",
      url: "/memo",
      data: {
        url_give: url,
        comment_give: comment
      },
      success: function (response) { // 성공하면
        alert(response["msg"]);
      }
    })
  }
</script>

<body>
  ...
  <div id="post-box" class="form-post" style="display:none">
    <div>
      <div class="form-group">
        <label for="post-url">아티클 URL</label>
        <input id="post-url" class="form-control" placeholder="">
      </div>
      <div class="form-group">
        <label for="post-comment">간단 코멘트</label>
        <textarea id="post-comment" class="form-control" rows="2"></textarea>
      </div>
      <button type="button" class="btn btn-primary" onclick="postArticle()">기사저장</button>
    </div>
  </div>
  ...
</body>
4) 완성 확인하기/새로고침
app.py 실행 후 URL과 코멘트를 입력하고 ‘기사 저장’ 버튼을 누르면, 서버에서 내려준 msg인 ‘저장이 완료되었습니다!’가 alert 창에 뜬다. Robo 3T에서 _id를 포함해 title, image, desc, url, comment 속성이 DB의 ‘articles’ 콜렉션에 저장되었음을 확인할 수 있다.
alert 창이 뜬 다음에도 input 박스가 입력된 그대로 남아있으므로, 페이지 새로고침이 자동으로 되도록 하면 좋을 것 같다. 페이지 새로고침을 위해 아래 코드를 alert 코드 밑에 입력한다.
// 새로고침
window.location.reload()
6. 리스팅 API 만들기(GET)
포스팅 API가 클라이언트에서 받은 URL, 코멘트를 이용해 페이지 정보를 찾고 저장했다면, 리스팅 API는 저장된 데이터로 카드를 생성해 보여준다.
1) 클라이언트/서버 연결 확인하기
@app.route('/memo', methods=['GET'])
def listing():
  sample_receive = request.args.get('sample_give')
  print(sample_receive)
  return jsonify({'msg':'GET 연결되었습니다!'})
<script>
  $(document).ready(function () {
    showArticles();
  });

  function showArticles() {
    $.ajax({
      type: "GET",
      url: "/memo?sample_give=샘플데이터",
      data: {},
      success: function (response) {
        alert(response["msg"]);
      }
    })
  }
</script>
app.py에서 listing API는 ‘/memo’ URL에 GET 요청을 하며, showArticles 함수에서는 같은 URL에 sample_give라는 변수로 데이터를 주고 있다. 이 함수는 페이지가 로딩되자마자 호출되므로, 서버와 클라이언트가 잘 연결되었다면 페이지를 새로고침하자마자 alert 창에 서버의 msg가 뜬다.
2) 서버 만들기
데이터 조회의 경우, 서버는 클라이언트에서 받아올 정보가 없다. 서버는 단순히 find를 이용해 여러 개의 데이터를 내려주면(return) 된다. 조건 없이 모든 데이터를 가져오는 것이므로 find의 첫 parameter를 {}로 두고, 가져온 데이터를 articles라는 변수에 담는다. 서버가 내려주는 값도 msg가 아니라 각각의 카드에 해당하는 모든 데이터다.
@app.route('/memo', methods=['GET'])
def listing():
  articles = list(db.articles.find({},{'_id':False}))
  return jsonify({'all_articles': articles})
3) 클라이언트 만들기
클라이언트 또한 서버에 가져갈 데이터가 없으므로 URL 뒤의 ?key=value를 지운다. 우선적으로, 클라이언트에 articles가 잘 내려오는지부터 확인해야 한다. console.log를 이용해 서버에서 내려준 array가 Console 창에 잘 찍히는지 확인한다.
<script>
  $(document).ready(function () {
    showArticles();
  });

  function showArticles() {
    $.ajax({
      type: "GET",
      url: "/memo",
      data: {},
      success: function (response) {
        let articles = response['all_articles']
        console.log(articles)
      }
    })
  }
</script>
코드 실행 후 페이지를 새로고침하면, 앞서 POST 연습 때 입력했던 데이터들이 Console 창에 array로 출력된 것을 볼 수 있다.
이제 이 array의 각 element를 카드로 만들어서 붙여야 하므로 for 문을 이용한다. 여기서도, 먼저 console.log를 사용해 각 변수들이 잘 전달되었는지부터 확인한다. 그 후, temp_html을 사용해 카드 HTML 태그를 입력한다.
function showArticles() {
  $.ajax({
    type: "GET",
    url: "/memo",
    data: {},
    success: function (response) {
      let articles = response['all_articles']
      for(let i = 0; i < articles.length; i++) {
        let title = articles[i]['title']
        let image = articles[i]['image']
        let desc = articles[i]['desc']
        let url = articles[i]['url']
        let comment = articles[i]['comment']
        // console.log(title, image, desc, url, comment)

        temp_html = `<div class="card">
                        <img class="card-img-top"
                          src="${image}"
                          alt="Card image cap">
                        <div class="card-body">
                          <a target="_blank" href="${url}" class="card-title">${title}</a>
                          <p class="card-text">${desc}</p>
                          <p class="card-text comment">${comment}</p>
                        </div>
                     </div>`
        $('#cards-box').append(temp_html)
      }
    }
  })
}
4) 완성 확인하기
완성된 페이지에서 포스팅 박스에 URL과 코멘트를 넣고 ‘기사 저장’을 누르면, 포스팅박스 하단에 카드가 하나씩 붙는 것을 확인할 수 있다.

4주차 숙제: 원페이지 쇼핑몰
0) 프로젝트 세팅/뼈대 준비하기
# app.py 뼈대
from flask import Flask, render_template, jsonify, request

app = Flask(__name__)

from pymongo import MongoClient

client = MongoClient('localhost', 27017)
db = client.dbhomework


## HTML 화면 보여주기
@app.route('/')
def homework():
  return render_template('index.html')


# 주문하기(POST) API
@app.route('/order', methods=['POST'])
def save_order():
  sample_receive = request.form['sample_give']
  print(sample_receive)
  return jsonify({'msg': '이 요청은 POST!'})


# 주문 목록보기(Read) API
@app.route('/order', methods=['GET'])
def view_orders():
  sample_receive = request.args.get('sample_give')
  print(sample_receive)
  return jsonify({'msg': '이 요청은 GET!'})


if __name__ == '__main__':
  app.run('0.0.0.0', port=5000, debug=True)
1) 주문하기(POST)
정보 입력 후 ‘주문하기’ 버튼 클릭 시 주문 목록에 추가하기
① 클라이언트/서버 연결 확인하기
@app.route('/order', methods=['POST'])
def save_order():
  sample_receive = request.form['sample_give']
  print(sample_receive)
  return jsonify({'msg': '이 요청은 POST!'})
<script>
  function order() {
    $.ajax({
      type: "POST",
      url: "/order",
      data: {sample_give:'샘플데이터'},
      success: function (response) {
        alert(response["msg"]);
      }
    })
  }
</script>
index.html 파일의 <script> 태그에 새로운 함수를 만든다. 페이지를 새로고침하면 ‘이 요청은 POST!’ alert 창이 뜨는 것을 볼 수 있다. 클라이언트와 서버의 연결이 확인되었다.
② 서버 만들기
서버는 클라이언트로부터 이름, 수량, 주소, 전화번호를 받아 이를 DB에 저장한다. app.py 파일 상단에 이미 import가 되어 있으므로 import는 생략한다.
client = MongoClient('localhost', 27017)
db = client.dbhomework

@app.route('/order', methods=['POST'])
def save_order():
  name_receive = request.form['name_give']
  quantity_receive = request.form['quantity_give']
  address_receive = request.form['address_give']
  number_receive = request.form['number_give']

  doc = {
    'name': name_receive,
    'quantity': quantity_receive,
    'address': address_receive,
    'number': number_receive
  }
  db.order.insert_one(doc)

  return jsonify({'msg': '주문 완료!'})
③ 클라이언트 만들기
<script>
function order() {
let name = $('#name').val();
let quantity = $('#quantity').val();
let address = $('#address').val();
let number = $('#number').val();
$.ajax({
type: "POST",
url: "/order",
data: {
'name_give': name,
'quantity_give': quantity,
'address_give': address,
'number_give': number
},
success: function (response) {
alert(response["msg"]);
// '주문 완료' alert 창 이후 새로고침
window.location.reload()
}
})
}
</script>
...
<body>
<div class="wrap">
<div class="image"></div>
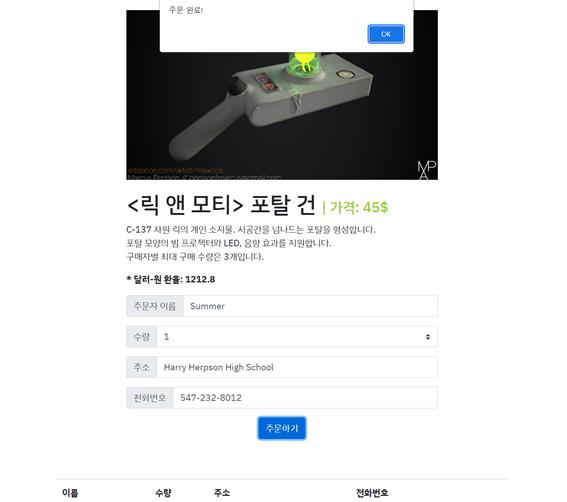
<h1><릭 앤 모티></릭> 포탈 건 <span>| 가격: 45$</span></h1>
C-137 차원 릭의 개인 소지물. 시공간을 넘나드는 포탈을 형성합니다.<br>
포탈 모양의 빔 프로젝터와 LED, 음향 효과를 지원합니다.<br>
구매자별 최대 구매 수량은 3개입니다.</p>
<p id="rate"></p>
<div class="input-group mb-3">
<div class="input-group-prepend">
<span class="input-group-text">주문자 이름</span>
</div>
<input type="text" class="form-control" aria-label="Username"
aria-describedby="basic-addon1" id="name">
</div>
<div class="input-group mb-3">
<div class="input-group-prepend">
<label class="input-group-text" for="quantity">수량</label>
</div>
<select id="quantity" class="custom-select">
<option selected>-- 수량을 선택하세요 --</option>
<option value="1">1</option>
<option value="2">2</option>
<option value="3">3</option>
</select>
</div>
<div class="input-group mb-3">
<div class="input-group-prepend">
<span class="input-group-text">주소</span>
</div>
<input type="text" class="form-control" aria-label="Username"
aria-describedby="basic-addon1" id="address">
</div>
<div class="input-group mb-3">
<div class="input-group-prepend">
<span class="input-group-text">전화번호</span>
</div>
<input type="text" class="form-control" aria-label="Username"
aria-describedby="basic-addon1" id="number">
</div>
<button type="button" class="btn btn-primary" onclick="order()">주문하기</button>
</div>
</body>
부트스트랩에서 사용자의 선택지는
<select>태그에 반영된다.
④ 완성 확인하기
주문자 이름, 수량, 주소, 전화번호를 입력하고 ‘주문하기’ 버튼을 누르면 ‘주문 완료!’ alert 창이 뜨며 페이지가 새로고침된다. Robo 3T에서 name, quantity, address, number 데이터가 입력되었음을 확인할 수 있다.
2) 주문 내역 보기(GET)
페이지 로딩 후 하단 주문 목록이 자동으로 보이게 하기
② 서버 만들기
@app.route('/order', methods=['GET'])
def view_orders():
  orders = list(db.order.find({},{'_id':False}))
  return jsonify({'orders': orders})
GET 요청에서 서버는 클라이언트에게 데이터를 받지 않는 대신, 클라이언트에게 데이터를 리스트(array) 형태로 내려줘야(return) 한다.
③ 클라이언트 만들기
<script>
  $(document).ready(function() {
    getRate();
    orderlist();
  });

  function orderlist() {
    $.ajax({
      type: "GET",
      url: "/order",
      data: {},
      success: function (response) {
        console.log(response['orders']);
      }
    })
  }
</script>
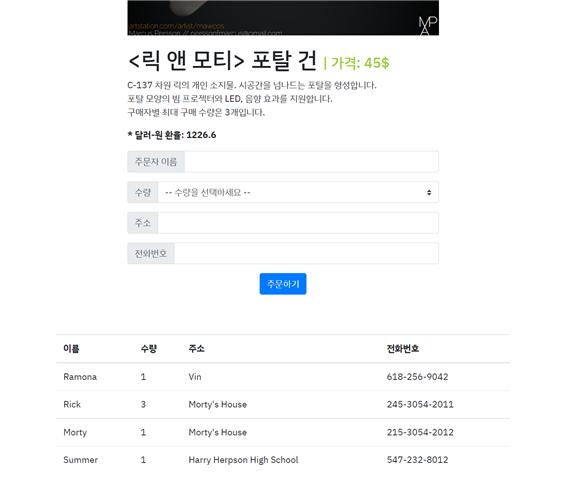
데이터 조회를 위해 GET 요청 함수는 페이지가 로딩되자마자 실행되어야 한다. 먼저 console.log를 이용해, 서버가 내려준 데이터가 클라이언트 쪽으로 잘 전달되었는지 확인한다. Console 창에서 입력한 데이터가 하나의 리스트로 전달된 것을 확인할 수 있다.
다음으로, 부트스트랩으로 주문서 아래 주문 내역을 기록하는 표를 만든다. 예시 코드와 결과물을 보고 구조를 파악한 후, temp_html과 for 문을 사용해 입력된 데이터를 출력한다.
<script>
  $(document).ready(function() {
    getRate();
    orderlist();
  });

  function orderlist() {
    $.ajax({
      type: "GET",
      url: "/order",
      data: {},
      success: function (response) {
        let order = response['orders'];
        for (let i = 0; i < order.length; i++) {
          let name = order[i]['name']
          let quantity = order[i]['quantity']
          let address = order[i]['address']
          let number = order[i]['number']

          let temp_html = `<tr>
                              <td>${name}</td>
                              <td>${quantity}</td>
                              <td>${address}</td>
                              <td>${number}</td>
                           </tr>`

          $('#table').append(temp_html)
        }
      }
    })
  }
</script>

...
<body>
  <table class="table">
    <thead>
      <tr>
        <th scope="col">이름</th>
        <th scope="col">수량</th>
        <th scope="col">주소</th>
        <th scope="col">전화번호</th>
      </tr>
    </thead>
    <tbody id="table">
    </tbody>
  </table>
</body>
④ 완성 확인하기
# app.py
from flask import Flask, render_template, jsonify, request

app = Flask(__name__)

from pymongo import MongoClient

client = MongoClient('localhost', 27017)
db = client.dbhomework


## HTML 화면 보여주기
@app.route('/')
def homework():
  return render_template('index.html')


# 주문하기(POST) API
@app.route('/order', methods=['POST'])
def save_order():
  name_receive = request.form['name_give']
  quantity_receive = request.form['quantity_give']
  address_receive = request.form['address_give']
  number_receive = request.form['number_give']

  doc = {
    'name': name_receive,
    'quantity': quantity_receive,
    'address': address_receive,
    'number': number_receive
  }
  db.order.insert_one(doc)

  return jsonify({'msg': '주문 완료!'})


# 주문 목록보기(Read) API
@app.route('/order', methods=['GET'])
def view_orders():
  orders = list(db.order.find({},{'_id':False}))
  return jsonify({'orders': orders})


if __name__ == '__main__':
  app.run('0.0.0.0', port=5000, debug=True)
<!--index.html-->
<!doctype html>
<html lang="en">

<head>
  <!-- Required meta tags -->
  <meta charset="utf-8">
  <meta name="viewport" content="width=device-width, initial-scale=1, shrink-to-fit=no">

  <!-- Bootstrap CSS -->
  <link rel="stylesheet" href="https://maxcdn.bootstrapcdn.com/bootstrap/4.0.0/css/bootstrap.min.css"
      integrity="sha384-Gn5384xqQ1aoWXA+058RXPxPg6fy4IWvTNh0E263XmFcJlSAwiGgFAW/dAiS6JXm" crossorigin="anonymous">

  <!-- Optional JavaScript -->
  <!-- jQuery first, then Popper.js, then Bootstrap JS -->
  <script src="https://ajax.googleapis.com/ajax/libs/jquery/3.5.1/jquery.min.js"></script>
  <script src="https://cdnjs.cloudflare.com/ajax/libs/popper.js/1.12.9/umd/popper.min.js"
      integrity="sha384-ApNbgh9B+Y1QKtv3Rn7W3mgPxhU9K/ScQsAP7hUibX39j7fakFPskvXusvfa0b4Q"
      crossorigin="anonymous"></script>
  <script src="https://maxcdn.bootstrapcdn.com/bootstrap/4.0.0/js/bootstrap.min.js"
      integrity="sha384-JZR6Spejh4U02d8jOt6vLEHfe/JQGiRRSQQxSfFWpi1MquVdAyjUar5+76PVCmYl"
      crossorigin="anonymous"></script>
  <link rel="preconnect" href="https://fonts.googleapis.com">
  <link rel="preconnect" href="https://fonts.gstatic.com" crossorigin>
  <link href="https://fonts.googleapis.com/css2?family=IBM+Plex+Sans+KR:wght@100;200;300;400;500;600;700&display=swap"
        rel="stylesheet">

  <title>릭앤모티 포탈건 공구 폼</title>
  <style>
      * {
        font-family: 'IBM Plex Sans KR', sans-serif;
      }
      .wrap {
        width: 550px;
        margin: auto;
      }
      .image {
        margin: 20px 0;
        height: 300px;
        background-image: url("https://cdna.artstation.com/p/assets/images/images/007/474/630/medium/marcus-persson-1.jpg?1506382601");
        background-size: cover;
        background-position: center;
      }
      span {
        font-size: 25px;
        color: yellowgreen;
      }
      .btn {
        display: block;
        margin: auto;
        margin-bottom: 70px;
      }
      .table {
        width: 800px;
        margin: auto;
        margin-bottom: 70px;
      }

      #rate {
        font-weight: bold;
      }
  </style>
  <script>
      $(document).ready(function() {
        getRate();
        orderlist();
      });

      function getRate() {
        $.ajax({
          type: "GET",
          url: "http://spartacodingclub.shop/sparta_api/rate",
          data: {},
          success: function (response) {
            let currentRate = response.rate;
            $("#rate").append(`* 달러-원 환율: ${currentRate}`);
            }
        })
      }

      function orderlist() {
        $.ajax({
          type: "GET",
          url: "/order",
          data: {},
          success: function (response) {
              let order = response['orders'];
              for (let i = 0; i < order.length; i++) {
                let name = order[i]['name']
                let quantity = order[i]['quantity']
                let address = order[i]['address']
                let number = order[i]['number']

                let temp_html = `<tr>
                                    <td>${name}</td>
                                    <td>${quantity}</td>
                                    <td>${address}</td>
                                    <td>${number}</td>
                                  </tr>`

                $('#table').append(temp_html)
              }
            }
        })
      }

      function order() {
          let name = $('#name').val();
          let quantity = $('#quantity').val();
          let address = $('#address').val();
          let number = $('#number').val();

          $.ajax({
            type: "POST",
            url: "/order",
            data: {
              'name_give': name,
              'quantity_give': quantity,
              'address_give': address,
              'number_give': number
            },
            success: function (response) {
              alert(response["msg"]);
              window.location.reload()
            }
        })
      }
  </script>
</head>

<body>
  <div class="wrap">
    <div class="image"></div>
    <h1><릭 앤 모티></릭> 포탈 건 <span>| 가격: 45$</span></h1>
    C-137 차원 릭의 개인 소지물. 시공간을 넘나드는 포탈을 형성합니다.<br>
    포탈 모양의 빔 프로젝터와 LED, 음향 효과를 지원합니다.<br>
    구매자별 최대 구매 수량은 3개입니다.</p>
    <p id="rate"></p>
    <div class="input-group mb-3">
      <div class="input-group-prepend">
        <span class="input-group-text">주문자 이름</span>
      </div>
      <input type="text" class="form-control" aria-label="Username"
              aria-describedby="basic-addon1" id="name">
    </div>
    <div class="input-group mb-3">
      <div class="input-group-prepend">
        <label class="input-group-text" for="quantity">수량</label>
      </div>
      <select id="quantity" class="custom-select">
        <option selected>-- 수량을 선택하세요 --</option>
        <option value="1">1</option>
        <option value="2">2</option>
        <option value="3">3</option>
      </select>
    </div>
    <div class="input-group mb-3">
      <div class="input-group-prepend">
        <span class="input-group-text">주소</span>
      </div>
      <input type="text" class="form-control" aria-label="Username"
              aria-describedby="basic-addon1" id="address">
    </div>
    <div class="input-group mb-3">
      <div class="input-group-prepend">
        <span class="input-group-text">전화번호</span>
      </div>
      <input type="text" class="form-control" aria-label="Username"
              aria-describedby="basic-addon1" id="number">
    </div>
    <button type="button" class="btn btn-primary" onclick="order()">주문하기</button>
  </div>

  <table class="table">
    <thead>
    <tr>
      <th scope="col">이름</th>
      <th scope="col">수량</th>
      <th scope="col">주소</th>
      <th scope="col">전화번호</th>
    </tr>
    </thead>
    <tbody id="table">
    </tbody>
  </table>
</body>
</html>
Leave a comment